ROUTERBY KEVIN PURDY JUN 15, 2010 9:00 AM
 If you're upgrading to a faster, stronger wireless router, don't chuck your older Wi-Fi box. With the magic of DD-WRT, you can turn your older wireless router into a range-expanding Wi-Fi repeater to cover everywhere you need a connection.
The advent of wireless home networks grew slowly in the past decade, but reached the point at which nearly every home with a high-speed connection had a wireless router that shared Wi-Fi connections throughout the home. Now Wireless N has become the standard at electronics retailers, promising faster connectivity with your wireless devices, faster transfer and streaming speeds between devices, and better connectivity. So what's to be done with your home's first wireless router?
 Our suggestion is to install the open-sourceDD-WRT firmware on your router and turn it into a repeater for your main router, expanding your Wi-Fi signal to reach every nook and cranny of your house, and even into your backyard or garage, if needed. You'll be able to use the same password and security scheme, you won't need anything except a power outlet for the repeater when you're done, and most of your devices will automatically switch between the two signals when needed.
We've previously run down how to install DD-WRT on a Linksys router to give it many, many more features, including the repeater function we'll cover here. If you've already installed DD-WRT, then, skip to the section on repeater configuration. One notable difference in this guide, too, is that I'm installing a custom build of DD-WRT, the "micro" flavor, on a Linksys WRT54G ver. 6, or "version 6." Adam wrote his original guide in 2006, with a fully-DD-WRT-compatible Linksys WRT54GL router, and at that point, those who picked up a blue Linksys box without knowing about open-source firmware were pretty much stuck. Now there's a huge array of supported devices, and even my sadly restricted Linksys can run a Micro build, and Micro now includes a repeater function.
Update: A Note on Speed
 Some intrepid bandwidth watchers, Will Smith among them, have pointed out that their own experiments with repeating signals has left them with slower connections. To be honest, I was using the repeater mostly for Google Reader in bed, and browsing and web working from outside the house, so I hadn't seen a noticeable drop in speed. A few tests atSpeedTest.net tell the tale. Pictured at left here is the result from my main router, a Buffalo model with Wireless N (detailed here), connecting from my upstairs office to the downstairs living room, then Buffalo, NY to Toronto, ON.
 This result is through the modified Linksys WRT54G ver. 6 router about 10 feet away, connected as a repeater to the Buffalo router downstairs, and then tested again through Toronto. There is, as you can see, a download speed difference, and if I'd been using my Wireless N modem, it might be even more severe. So take a repeater for what it is—a slight trade-off in speed for a greater reach, with your mileage varying based on your hardware and connection. You might also note, though, that using SpeedTest's Android app, I actually received better download speeds from my office through the repeater than through the main router—for a smaller antenna, perhaps, connectivity can sometimes win over latency concerns.
What You'll Need

• Compatible router: Grab that old-but-still-works router and flip it over. Get the model number off the label, and write down the MAC address, while you're at it—the locations for both, on a standard Linksys "blue box," are pictured above. Type the first few characters of your model number into DD-WRT's router database, and look for your model to pop up. If you get any kind of green "Yes" listed with your model, you're in the clear—even the most pared-down DD-WRT build, micro, supports the repeater function.
 • Firmware files for your router: In that same router database, click on the line that relates to your router model, then grab all the files listed there. You may not end up using all of them, but once you've taken your router offline, even if it's not your main router, you'll want to have all your files available offline.
• Print-out of your instructions: There's a good chance, if you've got a fairly popular router, that you'll have access to specific router model instructions on the DD-WRT wiki. You'll usually see a link on the same page as your firmware files; if not, go ahead and search the wiki. If you don't have a printer, or hate wasting paper, use a print-to-PDF tool like doPDF or the Nitro PDF Reader for Windows, or the built-in PDF functions in Mac or Linux. The reason, again, is that you want to be prepared in case you lose internet connectivity on one or more routers during the flash process.
• Ethernet cable & computer with Ethernet port: Enough cable to comfortably reach from your computer to the router you're working on, and a computer without any networking problems that you know of.
• A pen and paper: The paper for notes, and the pen for both writing and pressing and holding down the reset button on your router.
• At least an hour's time, and patience: Instructions for most routers are laid out in step-by-step detail, with very specific instructions. Even so, you do not want to rush things, or load the wrong file at the wrong time. Doing so opens the potential for a "bricked" router, one that doesn't work and can't be accessed or set back to its default, factory-fresh state. That's not going to happen to the patient, cautious firmware flasher, though.
Get Started
As stated above, different routers will take different paths to installing DD-WRT. There are some common procedures, and a general path, to getting it installed, though, so you can read along as I follow the DD-WRT Wiki's instructions for a WRT54G version 6 installation.
• Do a hard (30/30/30) reset on your router: A "hard" reset, or a "30/30/30," means locating the reset notch on the back of your router, then inserting a pen and holding it there for a total of 90 seconds—30 seconds at first with the power on, then yank the power cord and wait another 30, then plug the power cord back in and wait 30 seconds, all while still holding the pen. It seems a bit excessive, but trust me—I've had friends with electronic engineering skills explain just how finicky, and sometimes random, physical memory chips like those in routers can be at holding their settings or otherwise not completely blanking out.
• Set a static IP address on your computer: Most DD-WRT guides want you to set your computer's IP address, the one it draws from your router, to 192.168.1.7, and set a subnet mask to 255.255.255.0. How do you do this in your computer, without the router being accessible?
 Head to Windows' Network and Sharing Center, usually by right-clicking on your network connection icon in the system tray, or heading there through the Control Panel. In the left-hand panel, click "Change adapter settings," then right-click on your "Local Area Connection" offering and select Properties. Under the Network tab, select the "Internet Protocol Version 4 (TCP/IPv4)" and hit the Properties button. Now in the General tab, change the first radio switch button to "Use the following IP address:", then enter 192.168.1.7 in the IP Address field, and 255.255.255.0 should fill itself in under "Subnet mask." Make sure you've got the IP entered correctly—Windows can skip the "7" part if there's only a single digit in the third section—and hit OK when you're done.
Firmware Installation
Now we're gonna get serious. Connect the Ethernet cable between your computer and the router—be sure to insert the cable into one of the numbered ports, not the port labeled "Internet" that's slightly distanced from the others. Turn off any wireless connection to your main router, unplug any broadband cellular modems, and so forth.
 In the case of my WRT54G ver. 6, I had to create a customized flashing image for my router, with a designated MAC address written in. The MAC address is a supposedly unique identifier given to all computer hardware that can access the internet, one that allows networks to allow and block hardware based on this address. Your internet provider and the the cable modem they provided also tracks the MAC address of your router, and can deny service if a different router than the one the modem is used to servicing suddenly appears. So I followed the instructions for downloading GV5Flash.zip, unpacking its contents, then running the
 vximgtoolgui application and filling in the MAC address I wrote down from underneath my router, and pointing the app at a place to drop the resulting .bin file.
Now you're going to pull off one of those "hard," or 30/30/30 power cycles—hold down reset for 30 seconds plugged in, 30 unplugged, then 30 seconds again plugged in. When you're done, wait a few seconds, open your browser (making sure your computer's still connected by cable), point it to http://192.168.1.1, and you should get a prompt for a username and password. The default for my router in this mode is "root/admin"—yours can likely be found atRouterPasswords.com, or in your own DD-WRT instructions. After entering that combo, you should see the default router screen. A Linksys default usually looks like this:

In most cases, you're next going to head to the Administration section (circled in the pic), then click the Firmware Upgrade sub-section. It's usually a simple affair: a Browse button to find the file you want to upload, and an OK/Apply button to set it in motion. From here on out, unless you have my same exact router, you'll possibly have a different set of one or two files to upload, in a very particular order—follow your own DD-WRT customized instructions. In general, though, you'll be doing a procedure along these lines:
- Uploading a "prep" file that gets your router ready for a new firmware.
- Waiting a solid five minutes—no cheating.
- "Power cycle" the router (a simple unplug, 30-second wait, then re-plug).
- Re-connect to 192.168.1.1, see the "Management Mode" window, then upload your (possibly customized) specific DD-WRT image and hit Apply.
 After seeing this nice little "Upgrade Success" message, wait another full, honest five minutes.

- Open a TFTP program, usually provided among your DD-WRT files, and point it at 192.168.1.1 (your router). Select your specific DD-WRT firmware (a micro build, in my case), then set the retries to 99—But! Before hitting "Upgrade," power cycle your router, wait a few seconds after re-powering, then go for it. When your TFTP app has a green light and success message, wait another fullfive minutes, then come on back.
- Undo the static IP setup you put in place on your computer from the Network and Sharing settings. Unplug and re-plug your cable, then open a browser. If you can connect to 192.168.1.1 on your computer browser and see a setup page for DD-WRT, do a (final) 30/30/30 "hard" reset on your router, then check that you still see the DD-WRT setup. If so, you're all set up!
Setting Up the Repeater
Now that you've got your oldie-but-goodie router set up with DD-WRT, you can set it up to pick up the signal from your primary router and re-broadcast it within its own radius. Here's how to do that.
With your computer still hooked up to the now-secondary router, head into the DD-WRT setup screen. It will ask you to set a better password and username at first, so go ahead and do that—you'll probably want to set up the same admin/password as your primary router to avoid confusion. Once you're in, your setup screen will look something like this, as my Micro setup on my Linksys appears:

 First up, click on the Wireless tab, then choose Basic Settings. Switch "Wireless Mode" to "Repeater," and the "Wireless Network Name" to the same as the main router you're going to be re-broadcasting. Don't worry about the bridged/unbridged radio buttons—they'll set themselves later. Hit the "Save" button at the very bottom, but do not hit "Apply Settings" just yet.
 In the "Virtual Interfaces" section, below that main "Wireless Physical Interfaces" section you just modified, hit the "Add" button, then enter a new name for your repeater—don't use the same as your router, or else suffer the wrath of confused devices. Adding "Repeater" or "2" to the end of your main router's name is pretty sensible in most cases. If you prefer an access point that doesn't broadcast its name, save that for switching off later—while we're testing our repeater, we'll be using basic settings to make sure the connection goes through. Hit the "Save" button at the bottom again.

With the main Wireless tab still selected, head to the "Wireless Security" sub-tab to the right. You'll see two interfaces again—a "Physical Interface" and a "Virtual Interface." In the "Physical Interface" section at the top, fill in the same exact security settings as your primary router—the security mode, the algorithm (TKIP or AES, generally), and the password any device would use to connect. You might need to jump back into your primary router settings to confirm these—that's fine, but do so from another device. Under the "Virtual Interface" section, set up the same exact security settings as your primary router, again. Hit the "Save" key at very bottom again and, again, avoid "Apply Settings" for the moment.
 Jump over to the Setup tab at the very top, then scroll down to the Network Setup section under Basic Setup. The main thing to do here is slightly alter the "Local IP Address" from what your primary router is. If you connect to your main router at 192.168.1.1, for example, set this repeater router to something like 192.168.2.1, or another number that you can remember in the second-to-last position. Hit (you guessed it!) Save.
 Finally, head to the Security tab up top, and in the Firewall section, disable the "SPI Firewall," and un-check everything under the "Block WAN Requests," except "Filter Multicast." Hit "Save" at the bottom one last time. Finally, head over to Administration, double-check that you've got your administrator password written down or remembered, and hit "Apply Settings" at the very bottom. Your router will reset itself now, so give it time to do so.
Unplug your computer's Ethernet cable, turn on a wireless device, and see if you can find your new repeater bridge. Connect to it, use the same password you'd use for the main router, and you should have success. If not, run through the steps and double-check your settings. DD-WRT's wiki page for WLAN Repeaters has a good deal of troubleshooting advice, so check there too.
You've now got a second Wi-Fi station in your house that picks up signal from the main router and offers it out to devices that are farther out. It's likely not as fast a connection between devices—it's wireless G, in most cases, as opposed to N. Then again, at this point, there are very, very few services or streaming applications that make full use of Wireless N's crazy bandwidth potential, so your Hulu streaming, web browsing, and other usual internet life will likely be unaffected.
In my own case, my wife and I don't have to use modern-day divining tricks in our very non-linear Victorian home to keep a spotty Wi-Fi signal to an iPod touch or Android phone, and a side patio has just become a preferred secondary home office for the summer. As a bonus, my closest neighbors now know that I'm a serious, serious nerd when they fire up their laptops. Here's hoping you find similarly fun and free uses for a Wi-Fi repeater.
 Intel
Intel 



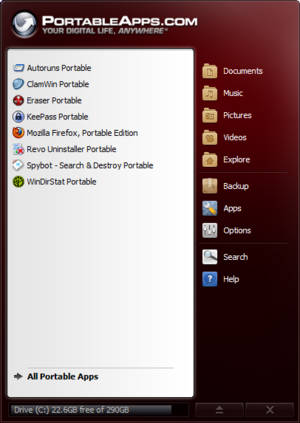 The Portable apps UI.
 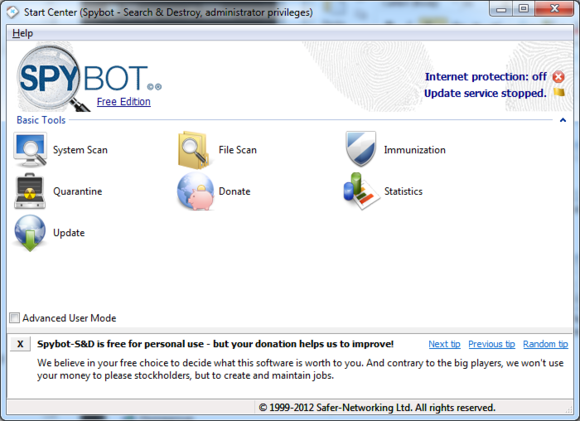 Spybot ain't fancy, but it works well.
  When you need to root out stubborn malware, a rootkit detector does the trick.
 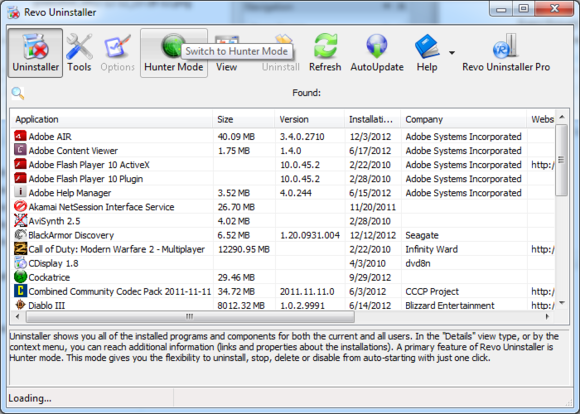 Revo Uninstaller makes uninstalling lots of programs a breeze.
 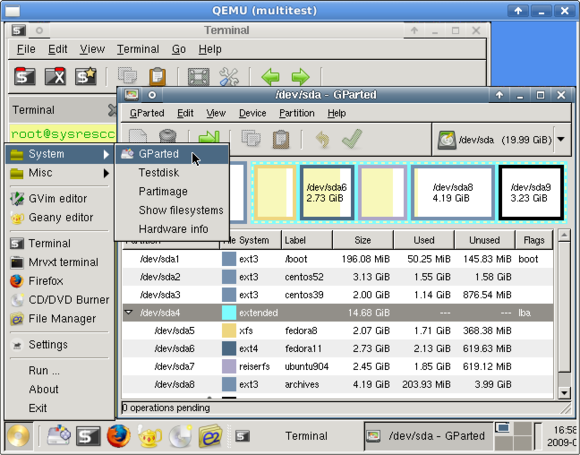 SystemRescueCD: Perfect for that oh-so-bonked PC.
  Windows Defender isn't subtle about being deactivated.
  How you want your Settings tab to look!


 If you're upgrading to a faster, stronger wireless router, don't chuck your older Wi-Fi box. With the magic of
  Our suggestion is to install the open-source
 Some intrepid bandwidth watchers,
  This result is through the modified Linksys WRT54G ver. 6 router about 10 feet away, connected as a repeater to the Buffalo router downstairs, and then tested again through Toronto. There is, as you can see, a download speed difference, and if I'd been using my Wireless N modem, it might be even more severe. So take a repeater for what it is—a slight trade-off in speed for a greater reach, with your mileage varying based on your hardware and connection. You might also note, though, that using SpeedTest's Android app, I actually received better download speeds from my office through the repeater than through the main router—for a smaller antenna, perhaps, connectivity can sometimes win over latency concerns.
 • Firmware files for your router: In that same
  Head to Windows' Network and Sharing Center, usually by right-clicking on your network connection icon in the system tray, or heading there through the Control Panel. In the left-hand panel, click "Change adapter settings," then right-click on your "Local Area Connection" offering and select Properties. Under the Network tab, select the "Internet Protocol Version 4 (TCP/IPv4)" and hit the Properties button. Now in the General tab, change the first radio switch button to "Use the following IP address:", then enter 192.168.1.7 in the IP Address field, and 255.255.255.0 should fill itself in under "Subnet mask." Make sure you've got the IP entered correctly—Windows can skip the "7" part if there's only a single digit in the third section—and hit OK when you're done.
  In the case of my WRT54G ver. 6, I had to create a customized flashing image for my router, with a designated MAC address written in. The MAC address is a supposedly unique identifier given to all computer hardware that can access the internet, one that allows networks to allow and block hardware based on this address. Your internet provider and the the cable modem they provided also tracks the MAC address of your router, and can deny service if a different router than the one the modem is used to servicing suddenly appears. So I followed the instructions for
 After seeing this nice little "Upgrade Success" message, wait another full, honest five minutes.

 First up, click on the Wireless tab, then choose Basic Settings. Switch "Wireless Mode" to "Repeater," and the "Wireless Network Name" to the same as the main router you're going to be re-broadcasting. Don't worry about the bridged/unbridged radio buttons—they'll set themselves later. Hit the "Save" button at the very bottom, but do not hit "Apply Settings" just yet.
  In the "Virtual Interfaces" section, below that main "Wireless Physical Interfaces" section you just modified, hit the "Add" button, then enter a new name for your repeater—don't use the same as your router, or else suffer the wrath of confused devices. Adding "Repeater" or "2" to the end of your main router's name is pretty sensible in most cases. If you prefer an access point that doesn't broadcast its name, save that for switching off later—while we're testing our repeater, we'll be using basic settings to make sure the connection goes through. Hit the "Save" button at the bottom again.
 Jump over to the Setup tab at the very top, then scroll down to the Network Setup section under Basic Setup. The main thing to do here is slightly alter the "Local IP Address" from what your primary router is. If you connect to your main router at 192.168.1.1, for example, set this repeater router to something like 192.168.2.1, or another number that you can remember in the second-to-last position. Hit (you guessed it!) Save.
  Finally, head to the Security tab up top, and in the Firewall section, disable the "SPI Firewall," and un-check everything under the "Block WAN Requests," except "Filter Multicast." Hit "Save" at the bottom one last time. Finally, head over to Administration, double-check that you've got your administrator password written down or remembered, and hit "Apply Settings" at the very bottom. Your router will reset itself now, so give it time to do so.